Introduction
Human induced pluripotent stem cell (iPSC)-derived neurons enable the study of neuronal cell biology in both healthy and pathological contexts. While studying mono-cultures of excitatory (glutamatergic) or inhibitory (GABAergic) neurons can be helpful, in the human brain, the functions of neurons are intimately connected, making co-culturing of these cell types desirable in vitro to understand neural biology and neurological diseases better.
Such co-culture cell models can be used to study the electrical activity in a heterogeneous neuronal network, to further shed light on the pathogenesis of diseases like autism, epilepsy, frontotemporal dementia and Alzheimer’s disease. Electrophysiological assays, such as Multi-Electrode Array (MEA), are especially useful for studying functional phenotypes associated with neurodegenerative disorders, such as the reduced electrical activity seen in the ioGlutamatergic Neurons Huntington’s disease model.
ioGABAergic Neurons and ioGlutamatergic Neurons are human induced pluripotent stem cell (iPSC)-derived inhibitory and excitatory neurons, precision reprogrammed using opti-ox™ technology. The following protocol describes the establishment of a neuronal co-culture system with a specific emphasis on preparing the co-culture for analysis with the MaxTwo High-Density Microelectrode Array (HD-MEA) System.


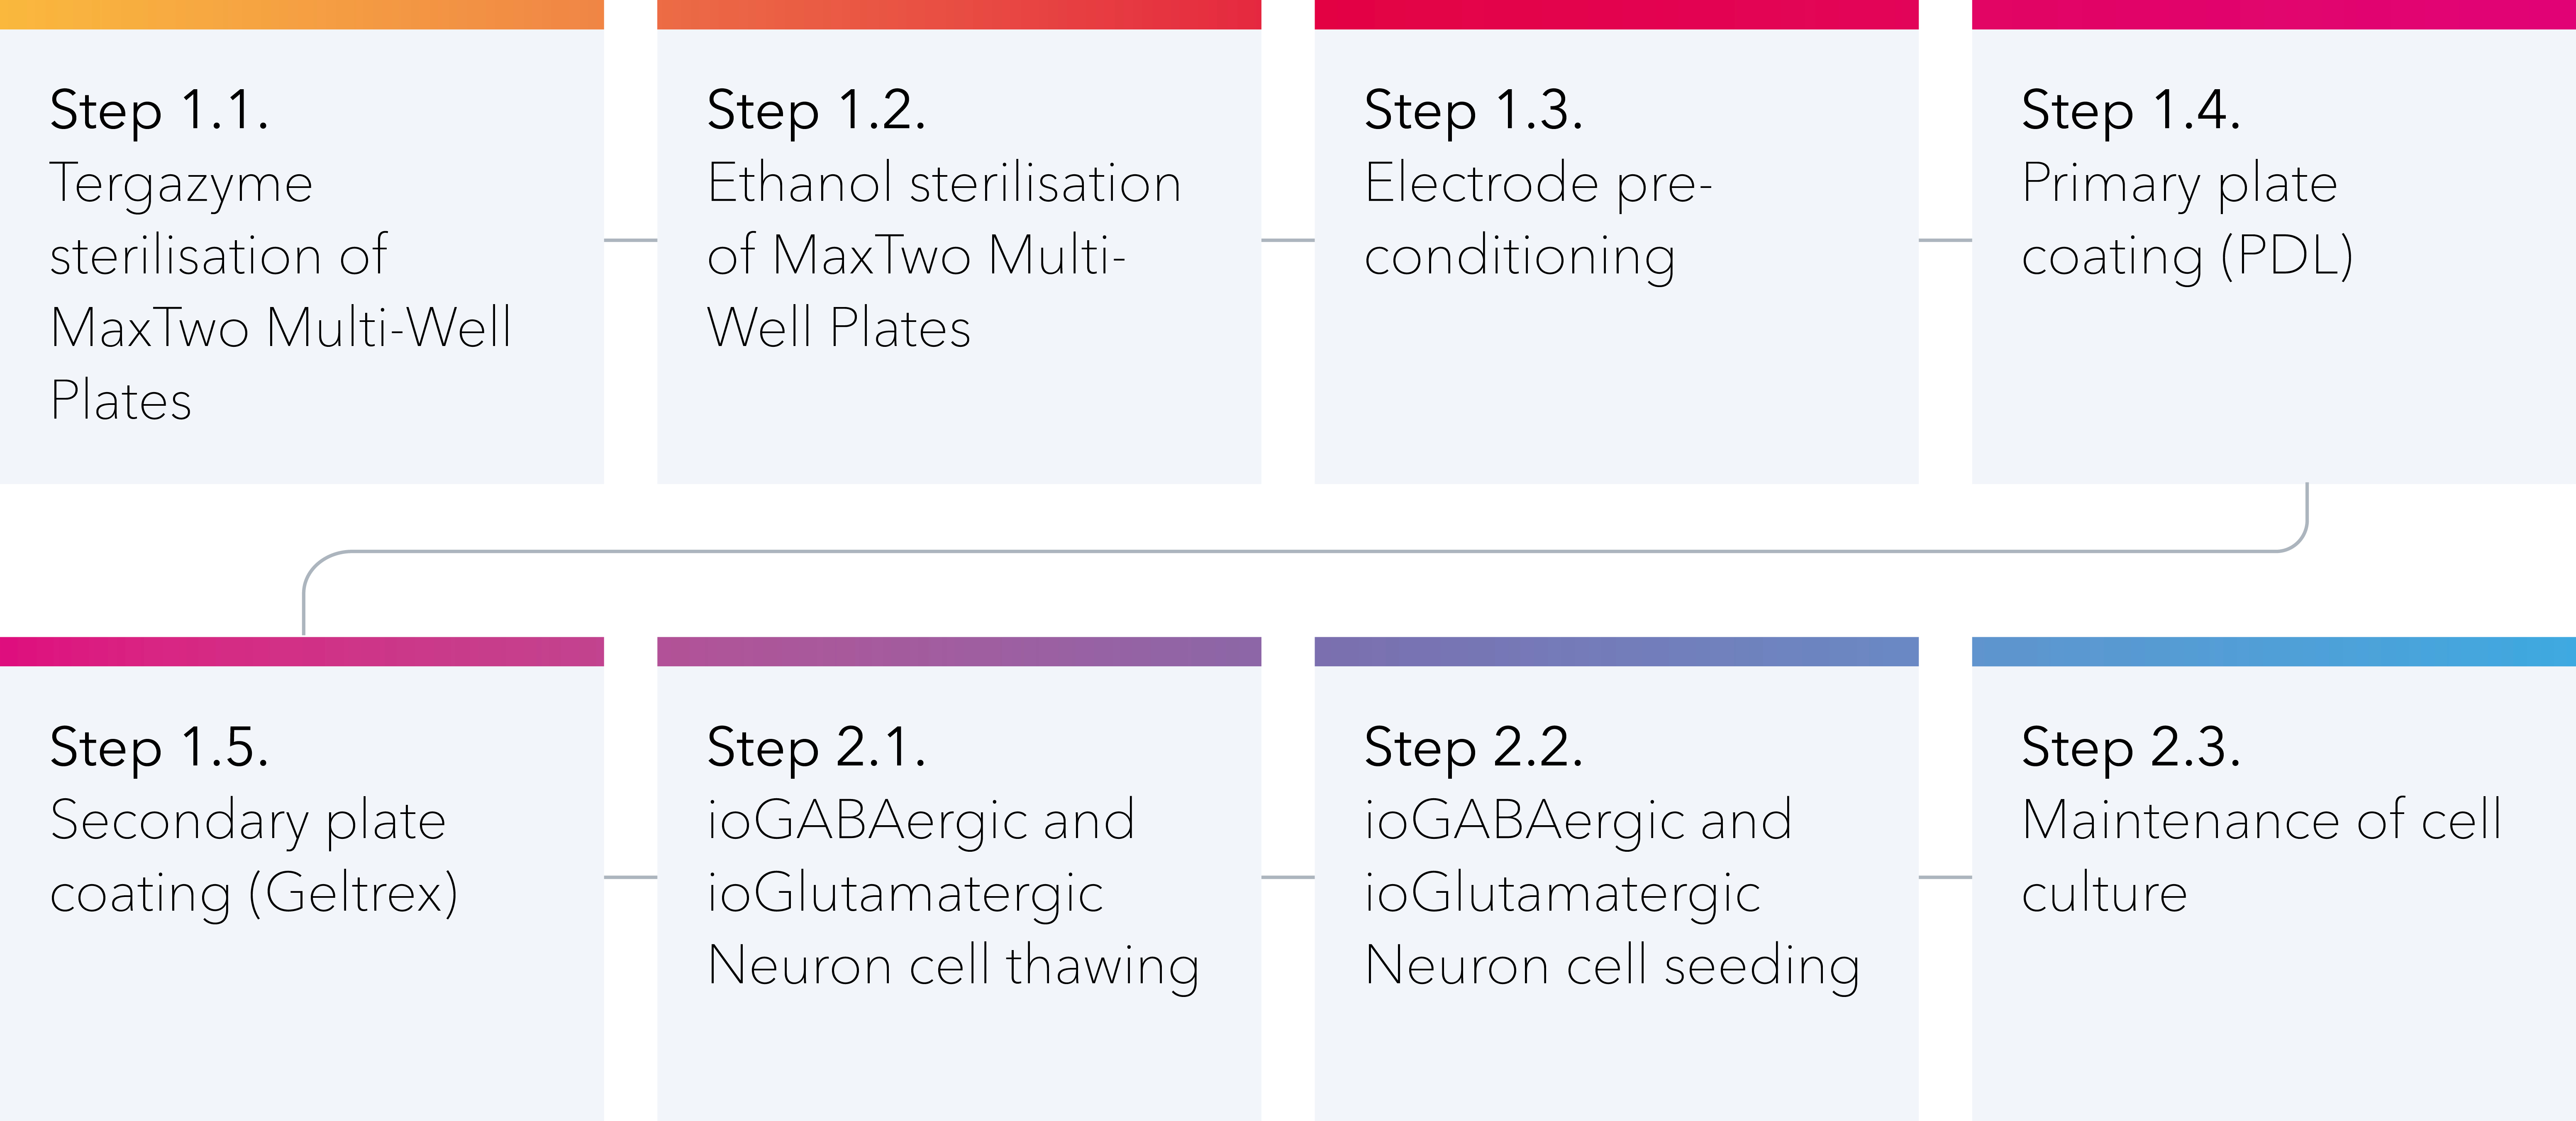
Protocol overview
Materials and equipment
-
Poly-D-Lysine (PDL)-hydrobromide (Sigma, P6407) - preparation described in Appendix 1
-
b:GN - as described in the ioGlutamatergic Neurons user manual
-
comp:GN+R+D - as described in the ioGlutamatergic Neurons user manual
-
DMEM-F/12 medium (multiple vendors)
-
Neurobasal medium (multiple vendors)
-
comp:GS - as described in the ioGABAergic Neurons user manual*
-
comp:GS+R - as described in the ioGABAergic Neurons user manual*
-
comp:MM - as described in the ioGABAergic Neurons user manual*
-
70% Ethanol in sterile deionised water
-
MaxTwo Multi-Well Plate (with lid) (MaxWell Biosystems AG; MX2-S-6W)
-
Biological safety cabinet
-
Standard tissue culture wares (pipettes, tips)
-
15mL tubes
-
1.5mL tubes
-
Normoxic cell culture incubator (37°C, 5% CO2)
-
Bench top centrifuge
-
37°C waterbath
-
Cell counter
* Please request the ioGABAergic Neurons user manual from technical@bit.bio if required.
Protocol
This protocol is split into two sections:
1: Surface preparation procedure for MaxTwo Multi-Well Plates.
2: Cell seeding, stabilisation, and maintenance.
1. Surface preparation procedure for MaxTwo Multi-Well Plates
1.1. Tergazyme sterilisation of MaxTwo Multi-Well Plates
1.1.1. Prepare a 1% Tergazyme solution (10g/L) in sterile deionised water. Use a freshly prepared 1% Tergazyme solution each time the plates are sterilised.
1.1.2. Collect plate(s) and spray front them and back thoroughly with 70% ethanol, while keeping the lid on.
1.1.3. Transfer the plate(s) to the biological safety cabinet.
1.1.4. Add 2mL of 1% Tergazyme solution into each well of the plate and incubate at room temperature for 2 hours.

1.1.5. Aspirate the 1% Tergazyme.
1.1.6. Add 2mL of sterile deionised water to each well.
1.1.7. Aspirate the deionised water.
1.1.8. Repeat steps 1.1.6 and 1.1.7 a further 2 times, for total of 3 washes. Ensure that the remaining deionised water is thoroughly aspirated before continuing with step 1.2.
1.2. Ethanol sterilisation of MaxTwo Multi-Well Plates
1.2.1. Fill each well and each compartment between the wells of the plate with 70% ethanol.
1.2.2. Incubate at room temperature for 30 minutes.
1.2.3 Aspirate the 70% ethanol.
1.2.4. Add 2mL of sterile deionised water to each well.
1.2.5. Aspirate the deionised water.
1.2.6. Repeat steps 1.2.4. and 1.2.5 a further 2 times, for total of 3 washes. Ensure that the remaining deionised water is thoroughly aspirated before continuing with step 1.3.
1.3. Electrode pre-conditioning
1.3.1. Fill each well of the plate(s) with 1.2mL of Neurobasal medium.
1.3.2. Cover the plate(s) with Breathe-Easy sealing membrane, and place the lid on top.
1.3.3. Incubate the plate inside the 5% CO2 incubator at 37°C for 2-3 days- this incubation may be performed over a weekend.
1.3.4. Following the 2-3 day incubation, aspirate the Neurobasal medium from the plate(s) and wash each well once with 2mL sterile deionised water.
1.3.5. Aspirate the deionised water. Ensure that the remaining deionised water is thoroughly aspirated before continuing with step 1.4.
1.4. Primary plate coating (PDL)
Tip: See the tutorial video for how to prepare tissue culture vessels with PDL-Geltrex™ for advice on coating the plates.
1.4.1. Add 50μL of the Poly-D-Lysine (PDL) in borate buffer solution (100μg/mL, appendix 1 for more details) to the centre of each well of the plate(s), fully covering the microelectrode array.
1.4.2. Cover the plate(s) with Breathe-Easy sealing membrane, and place the lid on.
1.4.3. Incubate plates at 37°C for 3 hours, or overnight.
1.4.4. Aspirate the PDL in borate buffer.
1.4.5. Add 1mL of sterile deionised water to each well.
1.4.6. Aspirate the sterile deionised water.
1.4.7 . Repeat steps 1.4.5. and 1.4.6 a further 2 times, for total of 3 washes. Ensure that the remaining deionised water is thoroughly aspirated before continuing with step 1.4.8.

1.4.8. Leave the lid off and let the plate(s) dry inside the microbiological safety cabinet for 1 hour. If the plate is not being used in the next step after the 1 hour incubation, replace the lid on the plate to ensure sterility.
1.5. Secondary plate coating (Geltrex)
1.5.1. Thaw an aliquot of Geltrex on ice for 30 minutes (refer to ioGlutamatergic Neurons user manual for details on Geltrex aliquot preparation).

1.5.2. Dilute the Geltrex at a factor of 1:100 in chilled DMEM/F-12 (e.g., 100μL of Geltrex in in 10mL of DMEM/F-12).
1.5.3. Gently add 10μL of the diluted Geltrex to the centre of the microelectrode array at the centre of each well. The functional electrode array is the silver rectangle at the centre of the gold. Once dispensed, the end of the tip may be used to manoeuvre the coating to cover the microelectrode array. Avoid touching the surface of the microelectrode array with the tip of the pipette.
Image: adding 10μL Geltrex solution to the microelectrode array at the centre of the MaxTwo Multi-Well Plate.
Image source: Maxwell Biosystems.

1.5.4. Cover the plate(s) with Breathe-Easy sealing membrane, and place the lid on top.
1.5.5. Incubate the plate(s) 37°C for 1 hour.
1.5.6. After incubating for 30 minutes, move on to step 2.1.1., to ensure that the cells are primed for seeding by the end of the 1-hour Geltrex incubation.

2. Cell seeding, stabilisation, and maintenance
2.1. ioGABAergic Neurons and ioGlutamatergic Neurons cell thawing

2.1.1. Thaw the individual vials of ioGABAergic Neurons and ioGlutamatergic Neurons following the ioGABAergic Neurons user manual for both cell types. Keep the cells in separate tubes (do not combine), and follow the ioGABAergic Neurons user manual from step 3.1.1 to 3.1.10.
2.1.2. Transfer the correct volume of ioGlutamatergic Neurons to a 1.5mL tube.
2.1.2.1. From the tube of counted ioGlutamatergic Neurons, calculate the volume required to seed each microelectrode array at 200,000 cells/10mm2 and multiply this by the number of wells in the experiment. Include an extra 100,000 cells to account for pipetting error. Refer to Table 1 for more information.
2.1.2.2. Transfer the calculated number of cells to a 1.5mL tube.
2.1.3. Transfer the correct volume of ioGABAergic Neurons to the same 1.5mL tube.
2.1.3.1. From the tube of counted ioGABAergic Neurons, calculate the volume required to seed each microelectrode array at 200,000 cells/10mm2 and multiply this by the number of wells in the experiment. Include an extra 100,000 cells to account for pipetting error. Refer to Table 1 for more information.
2.1.3.2. Transfer the calculated number of cells to the same 1.5mL tube that contains the ioGlutamatergic Neurons.

Table 1- Suggested cell seeding densities for a MaxTwo Multi-Well Plate (10mm2 surface area)
|
Cell type |
volume/10mm2 |
cells/10mm2 |
|
ioGlutamatergic Neurons |
- |
200,000 |
|
ioGABAergic Neurons |
- |
50,000 - 200,000 |
|
Total volume and cell number /10mm2 |
7μL |
250,000 - 400,000 |
2.1.4. Mix the 1.5mL tube gently by slowly pipetting up and down 4-5 times.
2.1.5. Centrifuge at 300 xg for 5 minutes.
2.1.6. Carefully remove the supernatant using a micropipette, taking care not to disturb the cell pellet.
2.1.7. Gently resuspend the pellet in an appropriate volume of comp:GS+R medium so that 7μL of medium contains 400,000 cells. Refer to Table 1 for more information.
Tip: If this protocol will be used for a tri-culture including astrocytes, we recommend the astrocyte seeding density be 100,000 cells/7μL (1:5 ratio of astrocytes to neurons).
2.2. ioGABAergic Neurons and ioGlutamatergic Neurons cell seeding
2.2.1. Following the 1 hour Geltrex incubation (step 1.5.5.), remove the coated plate(s) from the incubator and return them to the biological safety cabinet.
2.2.2. Aspirate the Geltrex coating from the centre of the well without touching the microelectrode array.
2.2.3. Immediately add 7μL of cell solution to the centre of each microelectrode array. The residual medium from the Geltrex coating will allow the cell suspension to flow over the microelectrode array completely.

2.2.4. Cover the plate(s) with Breathe-Easy sealing membrane, and place the lid on top.
2.2.5. Incubate the plate(s) at 37°C for 1 hour.
2.2.6. During the 1 hour incubation, prepare and pre-warm the medium for step 2.2.6. to allow a quick media addition after the 1 hour incubation.

2.2.7. After the 1 hour incubation, carefully fill each well of the plate(s) with 1.2mL of comp:GS+R medium. Pipette liquid slowly and on the side of the well.


2.3. Maintenance of the co-culture
2.3.1. Day 1: 24h post-thawing, gently aspirate 90% of the media and replace it with fresh pre-warmed complete GABAergic Neurons Stabilisation Medium (comp:GS medium).


2.3.2. Day 2: 48h post-thawing, gently aspirate 90% of the media and replace it with fresh pre-warmed complete GABAergic Neurons Stabilisation Medium (comp:GS medium).
2.3.3. Day 3: 72h post-thawing, gently aspirate 90% of the media and replace it with fresh pre-warmed complete GABAergic Neurons Maintenance Medium (comp:MM medium) (no doxycycline).
2.3.4. Day 6 onwards: for optimal co-culture maintenance, bit.bio recommends a half-medium change every 72-96h, replacing 50% of the medium with fresh complete GABAergic Neurons Maintenance Medium (comp:MM medium) (no doxycycline).
Tip: We recommend beginning MEA recordings at day 7 post thaw and continuing to a later stage in the culture, such as day 38, as the network between neurons will develop over time.
Appendix 1
Preparation of PDL coating solution
1. Make up 50mL of 1X borate buffer, by diluting 2.5mL of the 20X stock with 47.5mL of sterile water.
2. Resuspend the 5mg vial of PDL in 50mL of the 1X borate buffer, for a working concentration of 100μg/mL.
3. PDL coating solution can be aliquoted and stored at -20°C for long-term storage.
Reference data - MEA applications
MEA enables the electrophysiological activity of a cell to be measured. The electrodes embedded in the MEA plate are electrical conductors that connect with the biological element in the circuit. Each electrode embedded in the MEA plate is activated when a nearby cell emits an electrical current. The following data spotlights some past applications of MEA technology in ioGlutamaterigic Neurons, and may be similarly applied to other ioCells including ioGABAergic Neurons, and ioSensory Neurons.
1. When measured using MEA technology, ioGlutamatergic Neurons display a time-dependant increase in spontaneous activity. The increase in firing rate, spike amplitude, and number of active electrodes is an indicator of a maturing culture. In this way, MEA allows high-resolution individual and network electrical activity to be measured over time and space.
2. When measured after 20 days in culture, ioGlutamatergic Neurons in a co-culture with primary rat astrocytes showed prominent synchronicity. Network synchrony describes the simultaneous firing of electrical signals from multiple cells in a system. A synchronous phenotype such as this indicates a well-connected neuronal network.
3. In this MEA-focused Application Note, wild type ioGlutamatergic Neurons are compared to the Huntington’s Disease model to quantify the aberrant disease phenotype. The high-resolution tracking of electrical signals as they propagate through each cell can be used to measure the length, branch points, and number of axons in each cell in any neuronal culture.
MEA technology has many uses when studying neurons and neurodegenerative diseases. The applications listed here may be useful for analysing disease phenotypes, assessing compounds and drug candidates, and more.
Application support
If you have any questions or need assistance, please reach out to technical@bit.bio and we will do our best to support you.
Published August 2023, version 2